Background

Wednesday, February 29, 2012

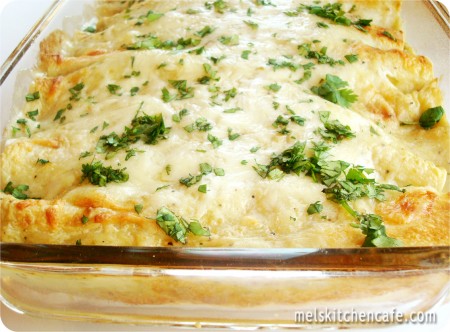
Creamy Green Chile Chicken Enchiladas


chicken enchiladas

Creamy Green Chile Chicken Enchiladas

*Serves 4-6
INGREDIENTS:
Filling:
3 cups cooked, chopped chicken
2 (4 oz.) cans of green chiles, lightly drained
1 package (8 oz.) cream cheese, cubed
1 can white or black beans, rinsed and drained (you can really use any type of bean you prefer here)
Sauce:
2 tablespoons butter
1/2 cup chopped onion (about 1/2 medium onion)
2 tablespoons flour
1/3 cup chicken broth
¼ cup milk
¼ teaspoon salt
¼ teaspoon pepper
1 can (7 ounce) green chile enchilada sauce
½ cup sour cream
8 ounces (about 2 cups) Monterey jack cheese, shredded
8 medium (soft taco size) flour tortillas
Handful of chopped fresh cilantro
(we added fresh chopped lettuce, tomatoes and avocado on top....its a must!!)

DIRECTIONS:
Preheat oven to 375 degrees.
In a medium bowl, combine the softened cream cheese and green chiles. Mix well. Add the chicken and black beans. Mix to combine. Set aside.
In a large nonstick skillet, melt the butter over medium heat. Add the onion and cook, stirring occasionally, until the onion softens and starts to turn translucent, about 3-4 minutes. Sprinkle the flour over the onions and stir well. Cook for 1 minute, stirring. Slowly whisk in the chicken broth and milk. As you whisk and the mixture cooks, the flour will get less lumpy around the onions and the mixture will become smooth. Cook over medium heat until the mixture is bubbling and has thickened, about 4-5 minutes. Remove the skillet from the heat and stir in the enchilada sauce and sour cream.
Lightly grease a 9X13-inch baking dish. Spread about 1/4 cup of the sauce on the bottom of the dish. Fill each tortilla with about ½ cup of the chicken/cream cheese filling. Top with a small handful of shredded cheese, a couple tablespoonfuls for each enchilada. Save at least 1/2 cup cheese for the top of the enchiladas. Roll the tortillas up and place seam side down in the prepared baking dish. Continue filling enchiladas until the dish is full (I can easily fit 8 enchiladas in one pan).
Pour the white sauce over the top of the enchiladas. Top with remaining cheese. Bake for 20-30 minutes until the enchiladas are bubbling, hot and lightly browned. Sprinkle fresh cilantro over the top and serve.

Thank you melskitchencafe.com for yet another hit dish, it was delicious and pretty easy to make. the best part is... you can make it, and while its baking you can clean your kitchen. I love to eat dinner and have a clean kitchen...cant beat that.

enjoy.
Amee

Monday, February 27, 2012

Pan-Roasted Chicken Breasts with Garlic-Sherry Sauce


This recipe comes from a recipe book created by the editors of Cook's Illustrated, entitled The New Best Recipes. It is now one of our favorites and every time I make it for guests, they rave about it. It's not that hard to make, but it tastes quite gourmet. To feed my husband, me, and our two small kids, I usually half the chicken portion using only 2 split chicken breasts, brining in 1 quart of water/salt solution. However, I do make the full recipe of the sauce since it doesn't make that much after it simmers down.

Chicken (I usually half this portion)
4 split chicken breasts with skin
1/2 cup salt
2 quarts cold water
black pepper to taste
1 teaspoon vegetable oil

Garlic-Sherry Sauce (I make this full portion)
4-6 garlic cloves cut crosswise into very thin slices
3/4 cup chicken broth
1/2 cup dry sherry (I use sherry cooking wine found near the vinegar and salad dressings)
2 sprig fresh thyme (I use a dash of dry thyme since I don't keep fresh thyme on hand)
3 tablespoons butter, cut into 3 pieces
1/2 teaspoon lemon juice
salt and pepper to taste

1. For the chicken: Dissolve the salt into the water in a large bowl. Immerse the chicken in the brine, cover and refrigerate until fully seasoned, about 30 minutes. Remove the chicken from the brine, rinse under cold water, and pat dry with paper towels. Season the chicken with pepper.

2. Adjust the oven rack to the lowest position and heat the oven to 450 degrees.

3. Heat oil in a 10 or 12 inch ovenproof skillet over medium-high heat. Swirl the skillet to coat with the oil. Brown the chicken, skin-side down, until deep golden, about 5 minutes; turn the chicken and brown until golden on the second side, about 3 minutes. Turn the chicken skin-side down and place the skillet in the oven. Roast 15-18 minutes. (The juices should run clear when the chicken is cut and the thickest part of the breast registers 160 degrees on an instant-read thermometer.)
Using an oven mitt or potholder, remove skillet from oven. Keep oven mitt on hot handle so you don't accidently burn yourself when you handle the skillet later. Transfer the chicken to the platter and let rest while making the sauce.

4. For the sauce: Still using the oven mitt, pour off most of the fat from the skillet; add the garlic slices, then set the skillet over medium-high heat and cook, stirring frequently until the garlic is lightly browned, about 1 1/2 minutes. Add the chicken broth, sherry and thyme, increase the heat to high, and simmer rapidly about 5 minutes, scraping the skillet bottom with a wodden spoon to loosen the browned bits, until slightly thickened and reduced to about 3/4 cup. Pour the accumulated chicken juices into the skillet, reduce the heat to medium, and whisk in the butter, one piece at a time, until incorporated. Add the lemon juice and season with salt and pepper to taste. Discard the thyme if you used a fresh sprig. Spoon the sauce around the chicken breast and serve immediately.

Thursday, February 23, 2012

Top of The Muffin To You!!

I got this recipe from Real Mom Kitchen, who I think got it straight from the Betty Crocker website. We love these! I always hated peeling the muffin from the paper lining cause most of it would stick to the paper, plus the top of the muffin is my favorite anyway. These are awesome cause you don't have to mess with the paper linings and the baking time is way less. It's like eating a muffin cookie!! Matt can eat 4 in one sitting. This recipe calls for the Betty Crocker Wild Blueberry mix, but I bet any muffin mix would work. Also, you don't follow the ingredients or instructions on the back of the muffin box. Use these ones instead. Enjoy : )


[muffin+tops+6+450.jpg]

Muffin Tops
  • 1 package Betty Crocker® wild blueberry muffin mix
  • 1/2 cup water
  • 3 tablespoons vegetable oil
  • 1 egg
Instructions
  1. Preheat oven to 425ºF (or 400ºF for dark or nonstick pan). 
  2. Drain Blueberries from muffin mix; rinse and set aside. Stir muffin mix, water, oil and egg in medium bowl just until blended (batter may be lumpy). Gently stir in blueberries.
  3. Drop batter by rounded tablespoonfuls about 2 inches apart ontoungreased cookie sheet.
  4. Bake 7 to 9 minutes or until edges and tops begin to brown (mine usually take longer then this to cook). Cool 1 minute before removing from cookie sheet.

Wednesday, February 22, 2012

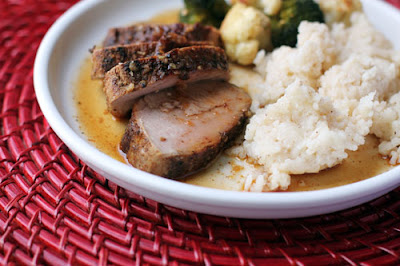
Island Pork with Sticky Coconut Rice

Oh my gosh, this dinner is AMAZING!! It's like nothing I've ever made before. I didn't even know what pork tenderloin was. I had to google it so I knew what to look for at the store, haha. I've also never used coconut milk, so I had no idea how the rice would turn out, but it was so good, and a perfect combination with the pork. This meal seems so gourmet, but it wasn't that hard to make. Does it get any better then that?? I got this recipe from This Week for Dinner. Once again, I halved this recipe and it was the perfect amount for Matt and I. It was a bit spicier then I like (Matt liked it), but I might try just a little less tabasco sauce next time). We will definitely make this again! I hope you like it as much as we did!!


Island Pork with Sticky Coconut Rice

For the pork:
- 2 pork tenderloins, 2 1/4 – 2 1/2 pounds total (they generally come 2 per package)
- 2 tablespoons olive oil

Rub:
- 2 teaspoons salt
- 1/2 teaspoon black pepper
- 1 teaspoon ground cumin
- 1 teaspoon chili powder
- 1 teaspoon cinnamon

Glaze:
- 1 cup brown sugar
- 2 tablespoons finely chopped garlic
- 1 tablespoon Tabasco
  1. Preheat oven to 350°F.
  2. Mix “Rub” ingredients, then coat pork.
  3. Heat olive oil in an ovenproof 12-inch heavy skillet over moderately high heat until just beginning to smoke, then brown pork, turning, a few minutes. Leave pork in skillet. If you don't have an ovenproof skillet, I bet you could just transfer the pork to a baking dish and bake it in that. 
  4. Mix glaze ingredients. Pat onto each tenderloin and roast in the center of oven until instant read thermometer inserted diagonally into center of each tenderloin reads 140°F, about 20 minutes. Remove from oven and let pork rest 10 minutes in skillet. Slice into 1/2″ – 1″ slices and serve over sticky coconut rice, pouring some of the remaining glaze over the pork and rice.

Sticky Coconut Rice
- 1 1/2 cup jasmine rice
- 1 15-oz can regular or light coconut milk
- 1/3 – 1/2 c. sugar
- 1 cup milk

If rice is not pre-rinsed (the bag will tell you if it is), rinse with cold water until water runs clear. Put rice in a medium sauce pan and combine with coconut milk, milk and sugar. Bring to a boil, stirring regularly, then reduce heat to low and cover pot. Simmer for about 25 minutes (could take up to 45 minutes depending on the rice). Stir regularly.

Rice and pork may be served with fresh, cubed mango, but this is optional (although I am certain it is delicious!).

Serves ~6 adults.

Tuesday, February 21, 2012

Suggestions are Welcomed

Feel free to send me any suggestions to improve the blog. I'm not very good at this blogging stuff, so if you have some good ideas or tips I'd love to hear them!! 
Thank!

Red and White Baked Pasta

This is one of our favs!! I got this recipe from Real Mom Kitchen (I have gotten a lot of recipes from here) Once again it's really easy and so good. I love it because it's a mix of red sauce and white sauce, and you use ground sausage (a nice change from chicken and hamburger). I have modified the recipe a little. I also half this recipe when it's just the 2 of us. Hope you like it as much as we do!!


Ingredients
  • 4 cups penne noodles (one box)
  • 1 (15 oz.) jar Alfredo sauce
  • 1 (24 oz ) jar marinara sauce
  • 2 cups shredded mozzarella cheese
  • 1 lb ground sausage
Instructions
  1. Preheat oven to 350 degrees.
  2. Cook and drain pasta according to package directions.
  3. Brown sausage in skillet (drain excess fat)
  4. Mix the two sauces together in a large mixing bowl.
  5. Add mozzarella cheese (leave a little extra for top) and combine. Add drained pasta and sausage.
  6. Pour into a 9×13 casserole dish and bake covered about 20-25 minutes until hot and bubbly.
  7. Sprinkle mozzarella on top and bake another five minutes. 
 Serves 6-8

Mexican Pot Pie

I got this recipe from Angela Johnson, who got it from Campbell's Kitchen. It's super easy and really good. The original name is Fiesta Chicken Casserole, but Mexican Pot Pie fits the dish much better, so I changed it. Haha. I also usually half the recipe because it makes too much for just Matt and I. Hope you enjoy it : )

Ingredients
  • 1 jar (16 ounces) Salsa
  • 1 can (10 3/4 ounces) Cream of Chicken Soup 
  • 1 cup sour cream
  • 2 cups shredded Cheddar cheese (about 8 ounces)
  • 1 package (12 ounces) frozen whole kernel corn
  • 2 cans (12.5 ounces each) White Chunk Chicken Breast in Water, drained
  • 1 can (about 15 ounces) black beans, rinsed and drained
  • 1 package (about 14 ounces) refrigerated pie crusts (2 crusts), at room temperature (or you can make your own)
Instructions
  1. Heat the oven to 400°F.
  2. Stir the picante sauce, soup, sour cream, cheese, corn, chicken and beans in a large bowl. Spoon the chicken mixture into a 3-quart shallow baking dish.
  3. Unfold the pie crusts on a lightly floured surface. Lay the crusts side-by-side so that they overlap by about 3 inches in the center. Press the seam to seal. Roll the pie crust into a 14 x 10-inch rectangle. Place the pie crust over the chicken mixture. Trim the excess crust. Press the crust to the rim to seal. Cut several slits in the crust.
  4. Bake for 40 minutes or until the crust is golden brown.

And So It Begins...

Hey everyone,
I've decided to start this blog because I'm in dire need of new recipes. I'm not use to being home and having to make dinner EVERY night. I came to a quick realization that I don't have that many recipes that I like, and we got tired of our usuals really quick. I've spent lots of time on the internet trying to find new recipes, and I could find a few, but not as many as I would have liked. I decided the best place to get new ideas would be from my friends who are making dinner every night as well! Anytime we go to a friends for dinner, it is always so good, so why not get all their tasty recipes?? So, here we are. I've really been looking forward to this, and I hope it's a success. Please feel free to post any recipes you like, it doesn't have to be just main dishes. Post a picture, if you have it (sometimes a recipe seems better if you can see what it looks like, but don't stress too much this), where you got the recipe (if you remember) and any other comments you want to make about the dish. Also, if you could label the recipe; main dish, appetizer, dessert, chicken, beef, etc, so people can start searching by labels. If you don't have time to do all that, it's fine, I'll just be happy to have a new recipe! I don't want people not to post because it's too much work. Well, I think that's all I have to say. I'm looking forward to all these new recipes!!